
Business administration
The structure is Business → Business units → Control Points: your organisation, its sites and the restrooms within each site. For example: Harbour Hospitality → Riverside Hotel → Ground-floor Gents Toilet.
Audience: Business administrators and permitted managers
Last reviewed: 2026-11-01
The structure is Business → Business units → Control Points: your organisation, its sites and the restrooms within each site. For example: Harbour Hospitality → Riverside Hotel → Ground-floor Gents Toilet.
To create a site, follow Set up a first location. To update it, open its edit action in Business units, check the details and save. Changing a site name does not move records between businesses.
Create your first restroom
- Open Control points and select Create control point where available.
- Select the correct business unit and enabled type, then enter the name used on site.
- Add a useful description if needed, such as “opposite reception”. Avoid staff personal information in names visible on customer feedback screens.
- Select Create Control Point and confirm the saved message.
- Follow Set expected checks to choose the schedule, then review the room details and sign assignment before use.
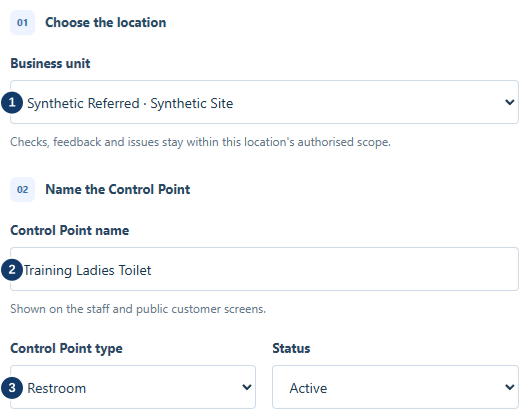
- Choose the correct business unit.
- Use a clear restroom name.
- Choose the enabled Restroom type.

- Create the room, then follow Set expected checks on the saved page.
Use consistent names: “Ground floor · Ladies”, “First floor · Accessible” and “Staff Toilet”. Different premises should not share a room record. Purchased capacity limits the number of active Control Points; ask your business administrator to review capacity if creation is blocked.
Set opening hours and timezone
- Open the site's edit action in Business units and find Operating hours.
- Confirm the timezone and choose the date the new hours start.
- Set each day to closed, open with the correct times, or open all day. Check any overnight opening carefully.
- Save the operating schedule. It starts on the displayed future local date, rather than changing earlier records.
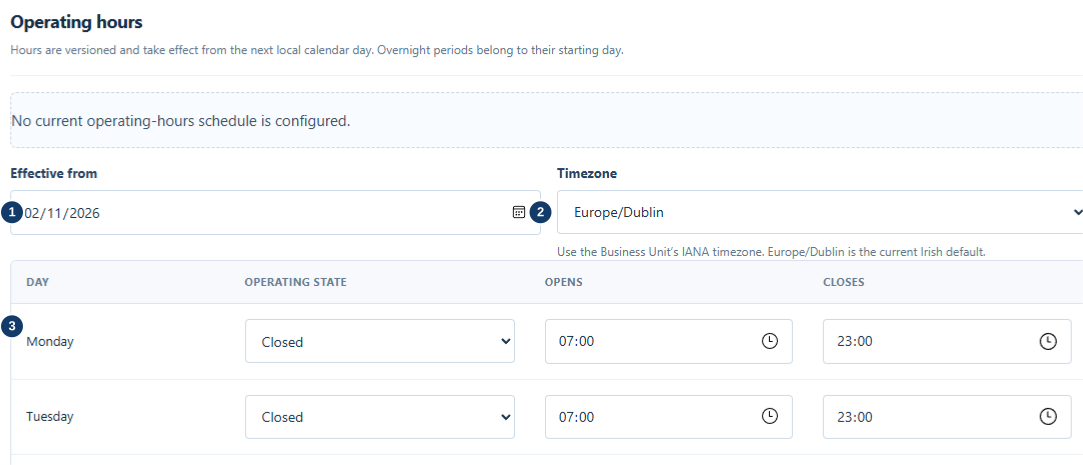
- Choose the date the hours take effect.
- Confirm the location timezone.
- Set each day; the first two weekdays are shown here.
Set the expected-check frequency
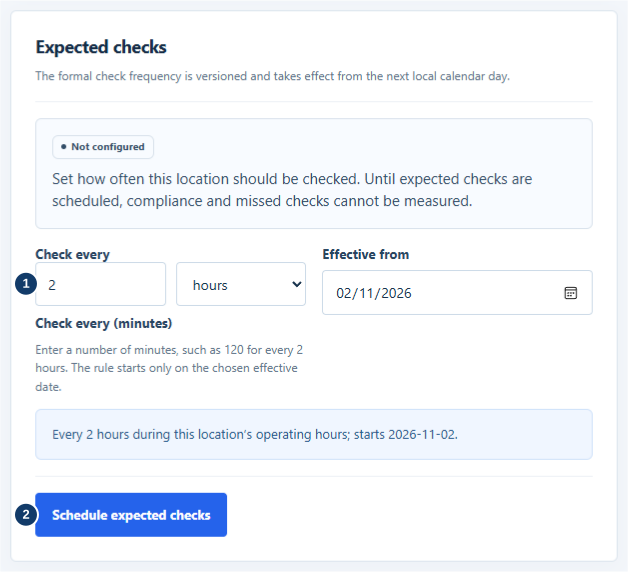
- Choose the expected frequency and effective date.
- Save the rule and review its start date.
- Confirm the room and site. Use the business unit’s actual opening hours.
- Choose the expected frequency and effective date.
- Select Schedule expected checks and review the saved or future-scheduled state.
Schedules, closures and inactive rooms
Expected checks depend on saved operating hours, frequency, timezone and applicable exclusion days. Review overnight opening carefully: an operating period may cross midnight. Exceptional closures mean no check is expected in the excluded period. Notification pauses are different: checks are still expected and misses still count.
Where an edit form exposes an active/inactive control, use it for the actual operational state. Retain historical records; do not create a replacement just to hide missed checks. If the required closure or business-detail control is unavailable to your role, ask your business administrator or Rest Easy support.